🤖GenAI from Scratch — Post 1 of 24 | Series: GenAI Foundations
📋 Table of Contents
- What This Post Covers
- AI → ML → DL → GenAI — The Hierarchy Explained
- Discriminative AI vs Generative AI
- A Brief History of Generative AI (2013–Today)
- What is Agentic AI?
- Tools You Need: Editor vs Code Editor vs IDE
- Why UV? The Modern Python Setup Tool
- Step-by-Step: Install UV
- Set Up Your First GenAI Project with UV
- Configure VS Code for GenAI Development
- Write and Run Your First Python File
- Common Errors and Fixes
- Key Takeaways
- What’s Next in This Series
You’ve been managing Oracle databases or running Kubernetes clusters for years. Your manager says “we need to integrate AI.” Everyone’s talking about ChatGPT, LLMs, and agents — but where does a DBA or infrastructure engineer even begin?
This is Post 1 of our GenAI from Scratch series — written specifically for people who are deeply technical on the infrastructure or database side but haven’t touched AI yet.
In this post, you’ll understand exactly where GenAI fits in the AI landscape, and you’ll have a fully working Python development environment — using the modern UV tool — by the end. No fluff. Just working code.
What you’ll be able to do after reading:
- Explain the difference between AI, ML, Deep Learning, and Generative AI
- Understand why GenAI is fundamentally different from traditional rule-based software
- Install and use UV — the modern, Rust-powered Python environment manager
- Set up VS Code for GenAI development with the right extensions
- Create an isolated Python project environment and run your first Python file
🔬 Lab Validated: All commands in this post were tested on Windows 11. UV version used: 0.4.x. VS Code version: 1.88+.
Prerequisites
Before you start, make sure you have:
- ☑ A computer running Windows 10/11, macOS 13+, or Ubuntu 20.04+ (Linux)
- ☑ Administrator / sudo access on your machine
- ☑ Internet connection
- ☑ VS Code installed — code.visualstudio.com (free)
- ☑ Basic comfort with a terminal / command line (you already use this for databases)
Python NOT required yet — UV will install and manage it for you. That’s the whole point.
Lab Environment
| Component | Version / Details |
|---|---|
| OS | Windows 11 (Used for all screenshots)/ Ubuntu 22.04 / macOS 14 Sonoma |
| UV | Latest (0.4.x as of writing) |
| Python | 3.12 (managed by UV — no manual install needed) |
| VS Code | 1.88+ |
| Terminal | PowerShell 7 (Windows) / bash or zsh (Mac/Linux) |
1. AI → ML → DL → GenAI — The Hierarchy Explained
Before writing a single line of code, you need a solid mental model of where GenAI fits.
Gen AI
AI (Outer) — Machines that mimic human decision-making
ML — Systems that learn patterns from data without being explicitly programmed
Deep Learning — ML using multi-layered neural networks (NN) for complex patterns
GenAI (Core) — Specialised DL that creates entirely novel content from scratch
Let’s define each layer precisely:
Artificial Intelligence (AI)
Definition: Machines programmed to exhibit human-like decision making.
This is the broadest category. A chess engine, a spam filter, a recommendation system — these are all AI. AI is the umbrella. Everything below is a subset of AI.
Machine Learning (ML)
Definition: Systems that learn patterns from data without being explicitly programmed with rigid rules.
🗄️ DBA Analogy
Traditional programming is like a stored procedure — you write exact rules: “IF salary > 100000 AND department = ‘FINANCE’ THEN flag = ‘HIGH'”. Machine Learning is like giving the database a million past examples and letting it figure out the rules itself. No hard-coded IF statements.
The ML flow :
Data  →  Algorithm  →  Mathematical Formula (model)
                              ↓
                        Fit the data
                              ↓
                        Fit the line (prediction)
Deep Learning (DL)
Definition: A specialisation of ML that uses Neural Networks (NN) — systems that auto-learn patterns from massive datasets without manual feature engineering.
Deep Learning is data hungry. It needs Big Data from the internet. The more data, the better the pattern recognition. This is why it wasn’t practical until the last decade — we simply didn’t have enough data or computing power before.
Generative AI (GenAI)
Definition: A specialised branch of Deep Learning that moves beyond classification to create entirely novel content from scratch by learning the distribution of data.
This is the key distinction :
ML/DL output:   Classification → Decision making → Predict weather
GenAI output:   Synthesise    → Image / Text / Code / Audio
Example — weather forecasting:
- Traditional ML: Feed 7 days of past data → model fits the line → predicts tomorrow’s weather (YES/NO)
- Generative AI: Feed 7 days of past data → GenAI generates 7 full days of synthetic weather data → uses that to predict, considering patterns from 10 years of historical data
The algorithm learns the distribution of data and can generate new synthetic data that looks and behaves like the original. That’s why ChatGPT can write a poem, generate code, or explain a database concept — it learned the distribution of human writing and generates new content that fits that distribution.
2. Discriminative AI vs Generative AI
This is the most important conceptual distinction. Here’s exactly how framed it:
| Aspect | Traditional / Discriminative AI | Modern Generative AI |
|---|---|---|
| What it does | Fits the line / learns boundaries between categories | Learns the full distribution of data |
| Output | A label, class, or decision (Cat/Dog, Yes/No, Fraud/Not) | New content: image, text, code, audio, video |
| Training goal | Draw boundaries between things it has seen | Understand the data so well it can create new instances |
| Example task | “Is this query a slow query?” → Yes/No | “Write me an optimized version of this query” → generates SQL |
| DBA equivalent | A rule-based alert: IF IO > threshold THEN alert | An AI that writes new runbooks, generates SQL, and explains errors |
💡 Key Insight: Traditional AI draws boundaries in data it has seen. Generative AI learns the underlying patterns so deeply that it can create data that never existed. That’s why ChatGPT can write a poem about Oracle Data Guard — it wasn’t trained on that exact poem, but it learned the distribution of technical writing and poetry, and can synthesize something new.
3. A Brief History of Generative AI (2013–Today)
Understanding the history explains why everything changed so fast in the last few years.
| Year | Milestone | What it meant |
|---|---|---|
| 2013 | VAE — Variational Autoencoders | First practical approach to generating new data. Could compress a 5GB image to 29b and reconstruct it. Proved generation was possible but limited. |
| 2014 | GAN — Generative Adversarial Networks | Two competing neural networks: one generates fake data, one detects fakes. The “will Smith eating spaghetti” deepfakes you’ve seen — GAN technology. Revolutionary for images. |
| 2017 | Transformers — “Attention is All You Need” (Google) | The architecture that changed everything. Understood data from context, optimised for computation and learning. Led directly to BERT and GPT. |
| 2018–2020 | BERT (Google) / GPT-1, GPT-2 (OpenAI) | First large language models. BERT for understanding, GPT for generation. Speech-to-text became practical. |
| 2022 | ChatGPT (OpenAI) | GPT-3/4 wrapped in a conversational interface. Hit 100 million users in 60 days. GenAI went mainstream overnight. |
| 2023–2026 | LLM Explosion + Agentic AI | Claude, Gemini, Llama, Mistral, multimodal models. AI that doesn’t just answer questions but takes actions. |
The key leap was Transformers in 2017. Everything before was impressive but limited. Transformers scaled — the more data and compute you threw at them, the better they got. That scalability is what made ChatGPT and everything after it possible.
4. What is Agentic AI?
Technology introduced Agentic AI as the next evolution beyond GenAI. Here’s exactly how it was explained:
GenAI  →  Understanding  →  Decision Making
                                ↓
System  →  understand  →  perform action / act
Regular GenAI answers questions. Agentic AI answers questions and then takes action.
Example :
📱 Agentic AI Example
You tell ChatGPT: “Call my brother.”
A regular LLM would say: “I can’t make phone calls.”
An Agentic AI would: understand the request → use a tool (phone call API) → actually make the call.
For a DBA: “Analyze this slow query and apply the fix.”
Agentic AI: understands the query → generates the index DDL → connects to the database → executes it → reports back. Fully automated.
🗄️ DBA Analogy — Agentic AI = Automated DBA Runbook
Think of Agentic AI as a DBA runbook that executes itself. Instead of you reading “Step 1: check v$session, Step 2: kill blocking session, Step 3: verify,” the AI does all of that using tools (VS Code, terminal, database connection, output validation) — autonomously. We’ll build this in Module 9 of this series.
We’ll cover Agentic AI deeply in later posts. For now, understand that it’s the destination we’re building toward — and everything in this series is a stepping stone to building those autonomous systems.
5. Tools You Need: Editor vs Code Editor vs IDE
Before any GenAI code, you need the right tools. The document explains three categories of development tools — this matters because you’ll use these every day.
| Type | What it is | Examples | Good for |
|---|---|---|---|
| Editor | Basic text editor. Can write, create, update files. No intelligence. | Notepad, nano, vim (basic mode) | Quick edits. Not for development. |
| Code Editor | Editor + syntax highlighting + error detection + extensions. Lightweight but powerful. | VS Code, Cursor, Sublime Text | Most developers. Perfect for GenAI work. |
| IDE (Integrated Dev Environment) | Code Editor + built-in debugger + project management + language-specific tools. Heavier. | IntelliJ (Java/Python), PyCharm (Python) | Enterprise Java/Python projects. More overhead. |
For this whole series, we use VS Code. It sits in the Code Editor category — powerful enough with extensions, but lightweight and fast. The bootcamp instructor specifically calls it out as the recommended tool.
The tech stack flow for our GenAI work:
Generative AI (field)
    ↑
   Code  ←  instruction to the system
    ↑
  Python  ←  programming language chosen by GenAI developer community
    ↑
    UV    ←  manages Python + packages + environments (fast, Rust-based)
    ↑
  VS Code ←  where you write the code
6. Why UV? The Modern Python Environment Manager
The series introduced UV as the preferred tool for managing Python environments. If you’ve used pip, venv, or Anaconda before, UV replaces all of them in one fast, simple binary.
The Problem with Old Approaches
Before UV, the Python ecosystem was fragmented. As a DBA, imagine if you needed four different tools just to set up a new Oracle client — one for the binary, one for the password, one for the schema, one for the tablespace. That’s what Python setup used to look like:
| Task | Old way (multiple tools) | UV (one tool) |
|---|---|---|
| Install Python | python.org installer or pyenv | uv python install 3.12 |
| Create virtual env | python -m venv venv | uv venv (auto) |
| Install packages | pip install pandas | uv add pandas |
| Lock dependencies | pip freeze > requirements.txt | uv.lock (auto-generated) |
| Manage Python versions | pyenv (separate install) | uv python pin 3.12 |
| Run a script | activate venv, then python file.py | uv run file.py |
UV is built in Rust, which makes it 10–100x faster than pip. Installing a package that takes 30 seconds with pip often takes under 2 seconds with UV.
💡 Infra Engineer Analogy: UV is to Python what Docker is to application deployment — it standardizes the environment, makes it reproducible across machines, and eliminates “works on my machine” problems. The uv.lock file is the equivalent of a Docker image digest — it pins every exact version so any team member gets the identical environment.
Two key files UV creates and manages:
pyproject.toml— The manifest file. You write here. Lists your project’s intent and dependencies.uv.lock— The truth file. UV writes here. Pins the exact version of every package and sub-dependency. Commit this to Git so everyone on your team gets identical environments.
7. Step-by-Step: Install UV
Windows (PowerShell — Recommended Method)
Open PowerShell as Administrator (right-click PowerShell → “Run as Administrator”) and run:
powershell -ExecutionPolicy ByPass -c "irm https://astral.sh/uv/install.ps1 | iex"Expected output:

Windows Alternative (WinGet)
winget install --id astral-sh.uv -emacOS / Linux
curl -LsSf https://astral.sh/uv/install.sh | shAfter installation, close and reopen your terminal, then verify:
uv --version📸 Screenshot: Termi

showing uv --version output confirming successful install.
⚠️ If you see “uv: command not found” after install:
Your PATH wasn’t updated automatically.
Windows: Search “environment variables” in Start → Edit System Environment Variables → Path → Add %USERPROFILE%\.local\bin
Mac/Linux: Add export PATH="$HOME/.local/bin:$PATH" to your ~/.zshrc or ~/.bashrc, then run source ~/.zshrc
8. Set Up Your First GenAI Project with UV
Now let’s build your project environment. Follow these steps in exact order — this is the correct UV workflow from the bootcamp.
Step 1: Install Python via UV
UV manages Python versions for you. Install Python 3.12 (the version we’ll use throughout this bootcamp):
# Install Python 3.12 — UV downloads it for you, no python.org needed
uv python install 3.12

# You can also install multiple versions side-by-side
uv python install 3.8   # installs 3.8 as well if you need it later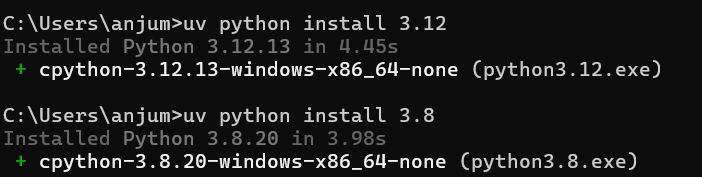
Step 2: Create Your Project Folder
# Create and enter your project folder
mkdir genai-bootcamp
cd genai-bootcamp
Step 3: Initialize the Project with UV
# Initialize the project — creates pyproject.toml and project structure
uv init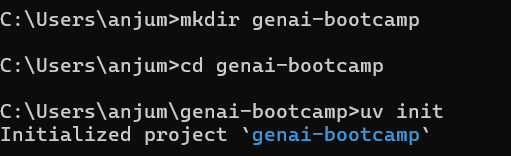
Your folder now looks like this:
genai-bootcamp/
├── pyproject.toml   ← YOUR manifest file (you edit this)
├── hello.py         ← sample file UV creates
└── .python-version  ← UV will create this after pinning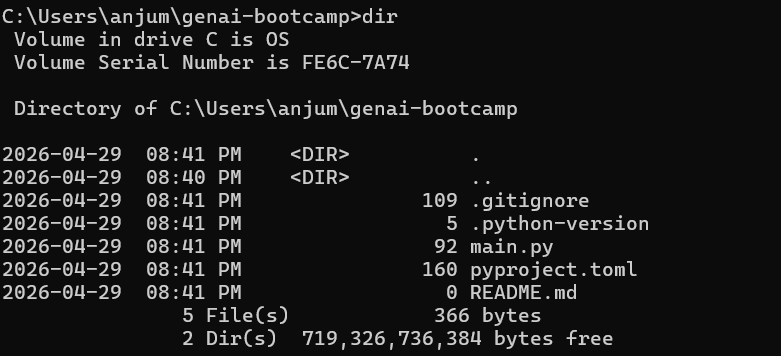
Step 4: Pin the Python Version
Pinning ensures everyone on your team uses the same Python version — critical for reproducible environments:
# Pin this project to Python 3.12
# UV creates a .python-version file — commit this to Git
uv python pin 3.12
Expected output:
Pinned `.python-version` to `3.12`📸 Screenshot: Pinning

Python 3.12 and the .python-version file appearing in VS Code explorer.
Step 5: Create the Virtual Environment (uv sync)
This is the most important UV command. uv sync reads your pyproject.toml, creates the .venv virtual environment, and installs all listed packages:
# Create the .venv and sync all dependencies
# Run this every time you add new packages or clone a project
uv sync
Expected output:
Creating virtual environment at: .venv
Resolved 0 packages in 3ms
Audited in 0ms
Your folder structure now:
genai-bootcamp/
├── .venv/           ← isolated Python environment (DO NOT edit manually)
├── pyproject.toml   ← your dependency manifest
├── uv.lock          ← exact pinned versions (commit to Git)
├── .python-version  ← Python version pin (commit to Git)
└── hello.py         ← sample Python file
📸 Screenshot: VS Code expl
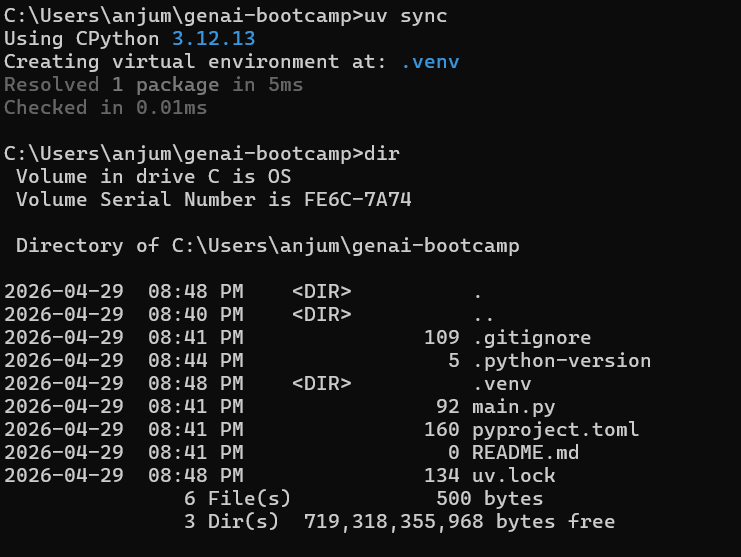
showing genai-bootcamp folder with .venv, pyproject.toml, uv.lock.
Step 6: Add Your First Packages
For our bootcamp, we’ll use OpenAI’s Python SDK and python-dotenv for secure API key management:
# Add packages — UV adds them to pyproject.toml AND installs into .venv immediately
uv add openai python-dotenv
Expected output:
Resolved 16 packages in 312ms
Installed 16 packages in 1.23s
 + annotated-types==0.7.0
 + anyio==4.4.0
 + openai==1.35.0
 + python-dotenv==1.0.1
 + ... (other dependencies)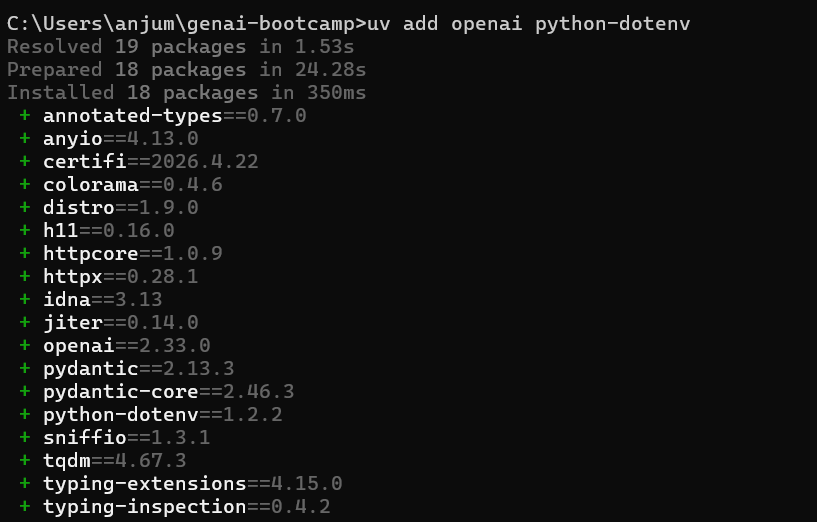
To verify what’s installed:
# See all installed packages
uv pip list
To remove a package later:
# Remove a package — also updates pyproject.toml
uv remove numpy
Step 7: Create Your .env File for API Keys
⚠️ Security Rule — Treat API Keys Like Database Passwords: Never hardcode API keys in Python files. Never commit them to Git. Always use environment variables or a .env file that is listed in .gitignore.
Create a .env file in your project root:
# .env  — never commit this file!
OPENAI_API_KEY=sk-proj-your-key-here
Create a .gitignore to protect it:
# .gitignore
.env
.venv/
__pycache__/
*.pyc
.DS_Store
Your final project structure before writing any GenAI code:
genai-bootcamp/
├── .venv/             ← virtual environment (NOT in Git)
├── .env               ← API keys (NOT in Git)
├── .gitignore         ← protects .env and .venv
├── pyproject.toml     ← dependency manifest (commit to Git)
├── uv.lock            ← exact versions (commit to Git)
├── .python-version    ← Python version pin (commit to Git)
└── hello.py           ← your code files go here
9. Configure VS Code for GenAI Development
Please install Visual Studio Code first
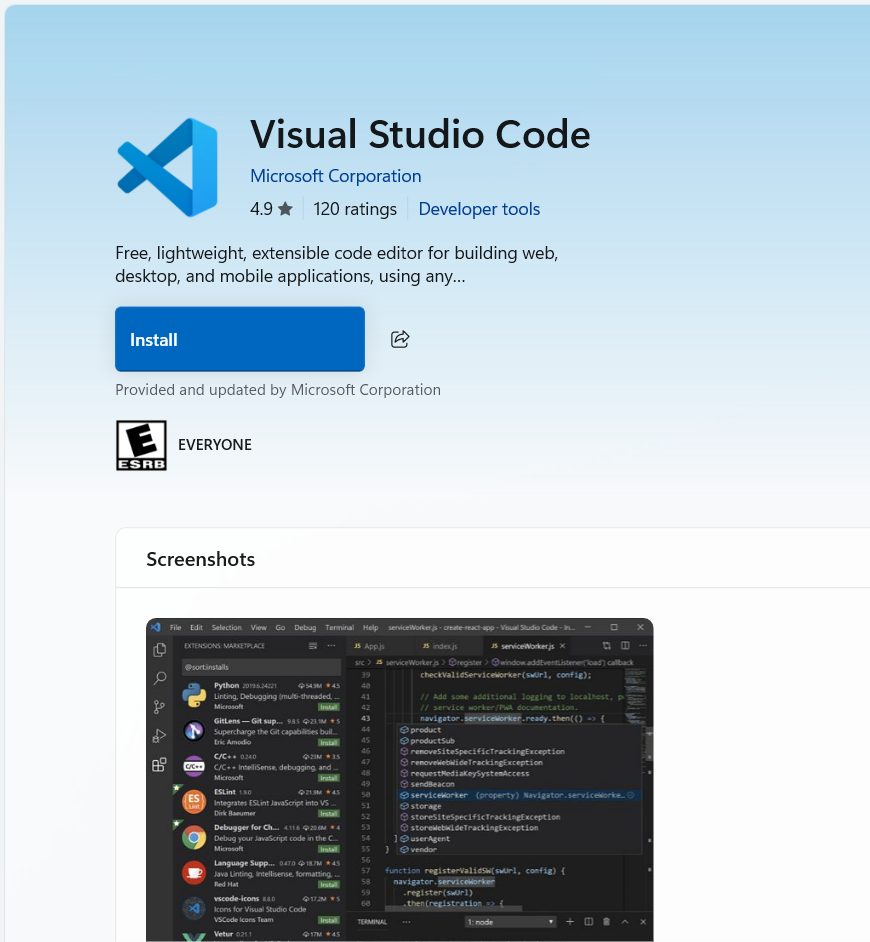
/The VS code can be found in microsoft store
# Open VS Code in current directory
code .
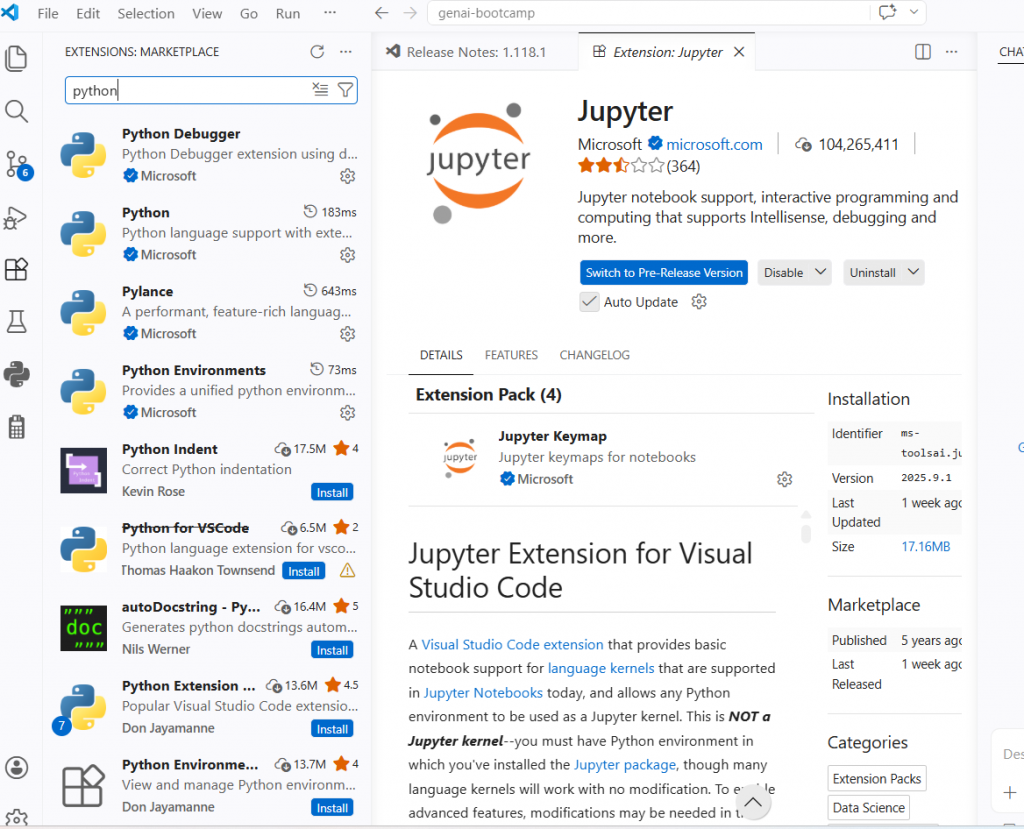
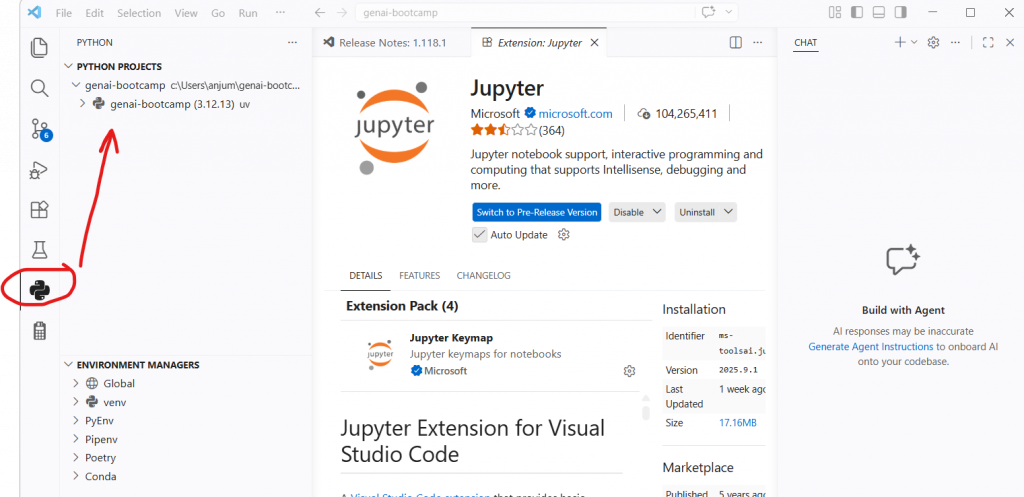
Install Essential Extensions
In VS Code, press Ctrl+Shift+X (Windows/Linux) or Cmd+Shift+X (Mac) to open Extensions. Install these:
| Extension | Why You Need It |
|---|---|
| Python (by Microsoft) | Core Python support — syntax highlighting, IntelliSense, debugging |
| Pylance (by Microsoft) | Advanced Python language server — better autocomplete and type checking |
| Python Environment Manager | Easily switch between UV environments and Python versions |
| Jupyter (by Microsoft) | Run Jupyter notebooks inside VS Code — useful for experimenting with LLMs |
| .env support | Syntax highlighting for your .env files |
📸 Screenshot: VS
Select Your UV Python Interpreter
This tells VS Code to use the Python inside your .venv:
- Press
Ctrl+Shift+P(Windows/Linux) orCmd+Shift+P(Mac) to open the Command Palette - Type: Python: Select Interpreter
- Click it and look for the option showing your
.venvpath — something like:Python 3.12.x ('.venv': venv) ./genai-bootcamp/.venv/... - Select it
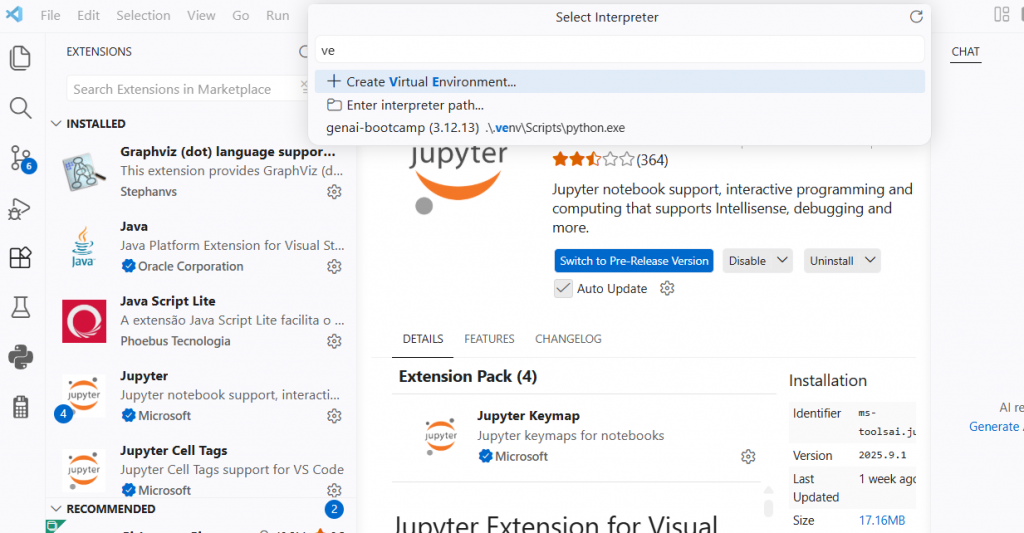
After selecting, you’ll see the Python version in VS Code’s status bar at the bottom left: 3.12.x ('.venv')
10. Write and Run Your First Python File
Now let’s write code and run it using UV — exactly as done in Class 01.
Method 1: Run with uv run (Recommended)
The notes showed two ways to run Python files. uv run is the modern way — no need to manually activate the virtual environment:
Create a file called hello_genai.py in your project:
# hello_genai.py
# First Python file in our GenAI bootcamp
# Run with: uv run hello_genai.py

print("Hello, GenAI Bootcamp!")
print("Python environment is working correctly.")
print("Ready to build Generative AI applications.")

# Verify our packages are importable
import openai
import dotenv
print(f"\nOpenAI SDK version: {openai.__version__}")
print("All packages loaded successfully!")
Run it from your terminal (no activation needed with UV):
uv run hello_genai.pyExpected output:
Hello, GenAI Bootcamp!
Python environment is working correctly.
Ready to build Generative AI applications.

OpenAI SDK version: 1.35.0
All packages loaded successfully!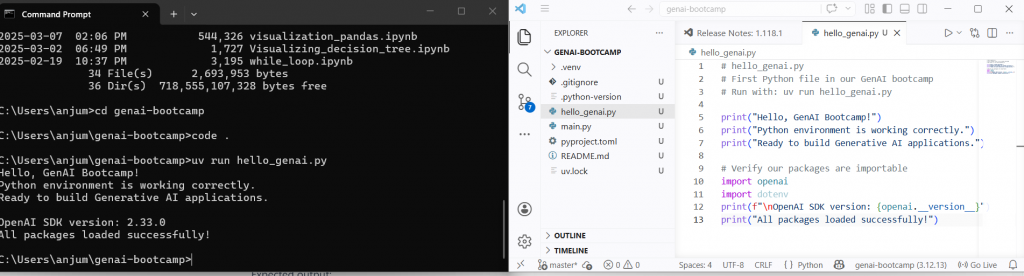
Method 2: Activate venv then run (Classic way)
If you prefer the traditional approach, you can also activate the virtual environment manually:
# Windows
.venv\Scripts\activate

# macOS / Linux
source .venv/bin/activate

# After activation, run normally:
python hello_genai.py

# Deactivate when done
deactivate
💡 Which method to use? Use uv run for running scripts — cleaner, no activation/deactivation needed. Use the manual activation method when you want an interactive Python session (python REPL) or when running long sessions in VS Code’s terminal. In this bootcamp series, we’ll use uv run for all script execution.
Quick UV Command Reference
| Command | What it does |
|---|---|
uv python install 3.12 | Download and install Python 3.12 |
uv python pin 3.12 | Pin this project to Python 3.12 |
uv init | Initialize a new project (creates pyproject.toml) |
uv sync | Create/update .venv to match pyproject.toml (most used) |
uv add numpy | Add numpy to project and install into .venv |
uv remove numpy | Remove numpy from project and .venv |
uv run file.py | Run a Python file using the project’s .venv |
uv pip list | List all installed packages |
uv cache clean | Clear UV’s download cache (use when things get weird) |
11. Common Errors and Fixes
Error 1: “uv: command not found” after installation
Symptom:
uv : The term 'uv' is not recognized as the name of a cmdlet...Cause: UV’s installation directory is not in your system PATH.
Fix (Windows):
# Search "Edit the system environment variables" in Windows Start
# Click Environment Variables → User variables → Path → Edit
# Add new entry: %USERPROFILE%\.local\bin
# Click OK → Close PowerShell → Reopen → try uv --version again
Fix (Mac/Linux):
echo 'export PATH="$HOME/.local/bin:$PATH"' >> ~/.zshrc
source ~/.zshrc
uv --version
Error 2: SSL Certificate Error during UV install (Corporate Networks)
Symptom:
SSL: CERTIFICATE_VERIFY_FAILED
error: could not fetch https://astral.sh/...
Cause: Corporate proxies (common in enterprise environments like banks, consulting firms) intercept HTTPS traffic and replace SSL certificates. This is expected on corporate machines.
Fix:
# Windows — set before running UV commands
set UV_NATIVE_TLS=true

# Mac/Linux
export UV_NATIVE_TLS=true

# Then retry the uv command that failed
Error 3: VS Code doesn’t show .venv in interpreter list
Symptom: When selecting Python interpreter, .venv doesn’t appear in the list.
Cause: VS Code hasn’t detected the new environment yet.
Fix:
# Option 1: Reload VS Code window
# Press Ctrl+Shift+P → type "Developer: Reload Window" → Enter

# Option 2: Make sure you opened VS Code FROM the project folder
# cd genai-bootcamp
# code .     ← this ensures VS Code knows the project root
Error 4: ModuleNotFoundError when running Python file
Symptom:
ModuleNotFoundError: No module named 'openai'Cause: You’re running Python from your system installation instead of from .venv.
Fix:
# Always use uv run (recommended — uses .venv automatically):
uv run hello_genai.py

# OR activate .venv first (classic method):
# Windows:
.venv\Scripts\activate
# Mac/Linux:
source .venv/bin/activate

# Then check you're using the right Python:
which python    # Mac/Linux — should show .venv path
where python    # Windows — should show .venv path
12. Key Takeaways
✅ What you learned in this post:
- AI → ML → DL → GenAI is a hierarchy of specialisation. GenAI is the innermost layer — the most capable, most data-hungry, and most creative branch of AI.
- Traditional AI is discriminative (fits lines, classifies) while Generative AI learns distributions — it can create new content, not just classify existing content.
- The Transformer architecture (2017) is what made modern GenAI possible. Everything from BERT to ChatGPT to Claude is built on Transformers.
- Agentic AI goes beyond answering questions — it understands context and takes actions using tools, making it the goal of enterprise GenAI deployment.
- UV is the modern standard for Python environment management — faster than pip, replaces venv/pyenv, and gives you reproducible environments via
uv.lock. - The correct UV project workflow is:
uv python install→uv python pin→uv init→uv sync→uv add <package>→uv run file.py
Test Your Knowledge
Ready to see how well you understood Class 01? Take the free quiz:
🧠 GenAI Foundations Quiz
20 questions · Instant feedback · Free genai-1-quiz – gradeupnow
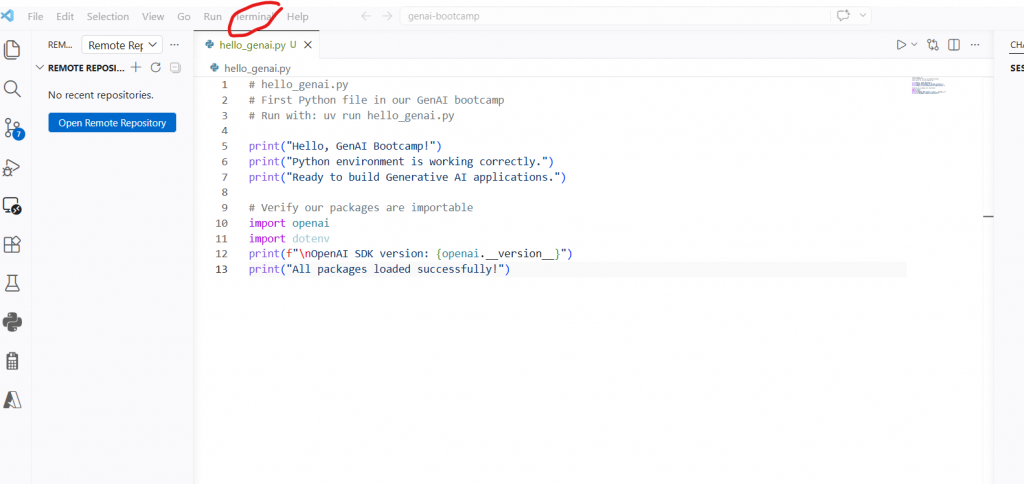
GitHub integration if you want to store code in git (Optional)
You may install github repository from extension for seamless integration with github

Please open the github icon and open your remote rep to store genAI codes. You need to login to github from this options with your credentials.

Now open terminal to run git commands to push code
You need to use git add . in terminal and configure your email and name.Now publish the code using this icon and push it after commit.
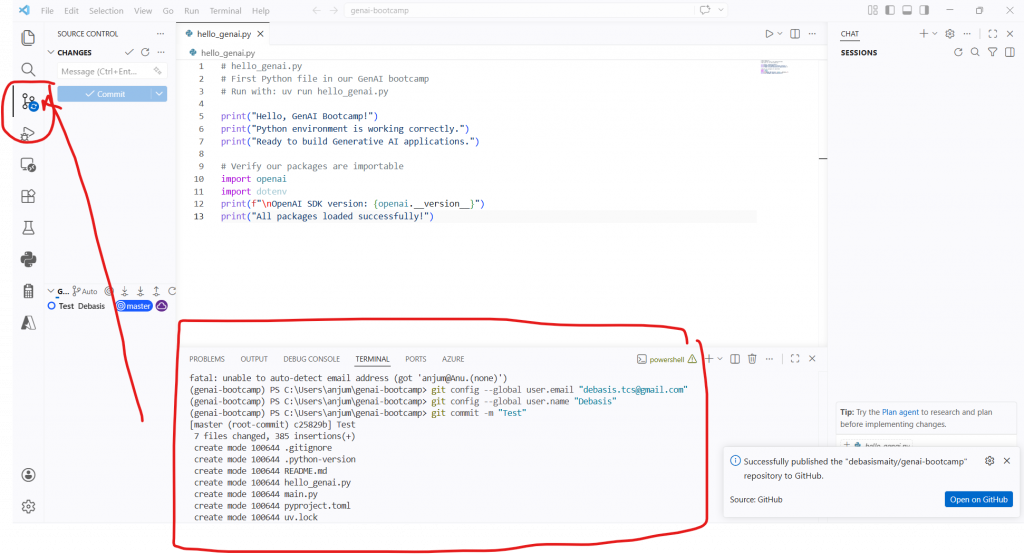
Now after publish and push, you can see your code in github repository.
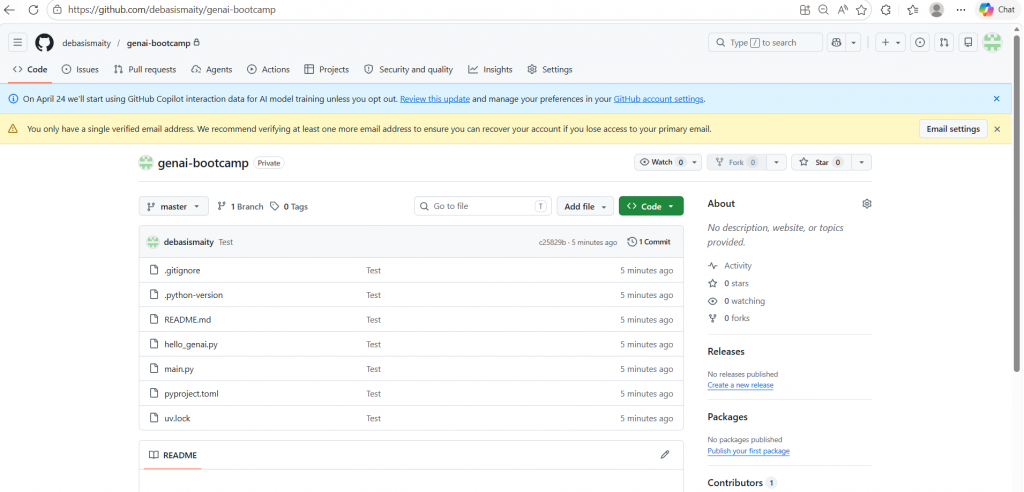
Next time if you update the code, you just need to run following command to push code in github directly.
(genai-bootcamp) PS C:\Users\anjum\genai-bootcamp> git add .
(genai-bootcamp) PS C:\Users\anjum\genai-bootcamp> git commit -m “Second update”
[master 1df0968] Second update
1 file changed, 1 insertion(+), 1 deletion(-)
(genai-bootcamp) PS C:\Users\anjum\genai-bootcamp> git push
Enumerating objects: 5, done.
Counting objects: 100% (5/5), done.
Delta compression using up to 8 threads
Compressing objects: 100% (3/3), done.
Writing objects: 100% (3/3), 298 bytes | 298.00 KiB/s, done.
Total 3 (delta 2), reused 0 (delta 0), pack-reused 0 (from 0)
remote: Resolving deltas: 100% (2/2), completed with 2 local objects.
To https://github.com/debasismaity/genai-bootcamp.git
c25829b..1df0968 master -> master
13. What’s Next in This Series
This post is Part 1 of the GenAI from Scratch series for DBAs and Infrastructure Engineers:
| # | Post | Status |
|---|---|---|
| 1 | What is GenAI? + UV Setup (this post) | 📍 You are here |
| 2 | How LLMs Work — Transformers, Tokens & Embeddings Explained | ⬜ Next week |
| 3 | ChatGPT vs Claude vs Gemini — Honest Comparison for Engineers | ⬜ Coming soon |
| 4 | Tokens, Temperature & Context Windows — The Parameters That Matter | ⬜ Coming soon |
| 5 | Prompt Engineering — From Zero to Advanced (DBA Edition) | ⬜ Coming soon |
👉 Next Post: https://gradeupnow.in/genai-blog-how-llms-work/
References
Found this helpful? Share it with your DBA team! Questions or errors? Drop them in the comments — we reply to every one.