Introduction
Every PostgreSQL cluster you’ve deployed in this series so far has quietly used the simplest bootstrap method — initdb. It’s the default, and it’s why a 7-line YAML file was enough to get a running cluster in Posts 2 and 3.
But initdb is only one of three ways to bring a new CloudNativePG cluster into existence. The other two — recovery and pg_basebackup — let you create a cluster that starts life already populated with real data, either from a backup or by cloning a live running instance. Understanding all three, and when to use each, is essential before you touch backup/recovery (Post 8) or replica clusters for disaster recovery.
This post breaks down all three bootstrap methods with working YAML you can test on your Kind cluster from Post 3.
What you’ll learn:
- The three bootstrap methods and when to use each
- How to customize
initdb— locale, encoding, checksums, WAL segment size - How to run custom SQL automatically after cluster creation (
postInitSQLand friends) - How the
externalClusterssection works and why it’s central to both recovery and cloning - How to clone a live cluster with
pg_basebackupusing both password and TLS authentication - The real limitations of physical cloning — and why it’s the wrong tool for external migrations
Prerequisites
Before you start, make sure you have:
- [ ] The Kind cluster
pgfrom Post 3 running, with CloudNativePG operator installed - [ ] The
cnpgkubectl plugin working - [ ] A basic understanding of Kubernetes Secrets (we’ll create a few in this post)
- [ ] The
cluster-examplecluster from earlier posts (optional — we’ll create new ones too)
Lab Environment
| Component | Version / Details |
|---|---|
| Kubernetes | Kind v0.27 (from Post 3) |
| CloudNativePG Operator | v1.28.1 |
| PostgreSQL | 16.x / 17.x / 18.x (version-dependent examples) |
| kubectl | v1.32+ |
| cnpg plugin | v1.25.0+ |
The Three Bootstrap Methods — Overview
┌─────────────────────────────────────────────────────────────────┐
│                   bootstrap: (choose exactly ONE)                │
├─────────────────┬─────────────────────┬───────────────────────┤
│     initdb       │      recovery       │     pg_basebackup     │
│   (default)      │                     │                       │
├─────────────────┼─────────────────────┼───────────────────────┤
│ Brand new,       │ Restore from a      │ Live clone of a       │
│ empty database   │ physical backup     │ running PostgreSQL    │
│                  │ in object storage   │ instance via          │
│                  │                     │ streaming replication │
├─────────────────┼─────────────────────┼───────────────────────┤
│ Use for:         │ Use for:            │ Use for:               │
│ • New apps       │ • Disaster recovery │ • Reporting clusters   │
│ • Fresh clusters │ • Replica clusters  │ • Test data refresh    │
│                  │ • Cloning to new NS │ • Quick standalone     │
│                  │   or K8s cluster    │   replica spin-up      │
└─────────────────┴─────────────────────┴───────────────────────┘
Important: Only one bootstrap method can be defined per
Clustermanifest. Trying to specify more than one results in a validation error.
Both recovery and pg_basebackup depend on a shared concept: externalClusters — a way of pointing your new cluster at an existing PostgreSQL source, whether that’s an object store full of backups or a live running database.
Part 1: Bootstrap from Scratch — initdb
This is what every cluster in this series has used so far. It runs PostgreSQL’s native initdb command to create a fresh, empty data directory.
Step 1.1: The Full initdb Structure
apiVersion: postgresql.cnpg.io/v1
kind: Cluster
metadata:
  name: cluster-example-initdb
spec:
  instances: 3
  bootstrap:
    initdb:
      database: app
      owner: app
      secret:
        name: app-secret
  storage:
    size: 1Gi
This does four things automatically:
- Runs
initdbto create a new PGDATA directory - Creates an unprivileged user named
app - Sets that user’s password from the
app-secretSecret - Creates a database called
app, owned by theappuser
Convention over configuration: If you don’t specify
databaseandownerat all, the operator defaults to creating anappdatabase owned by anappuser, with a securely auto-generated random password. This is exactly what happened invisibly in Posts 2 and 3.
Step 1.2: Supplying Your Own Password Secret
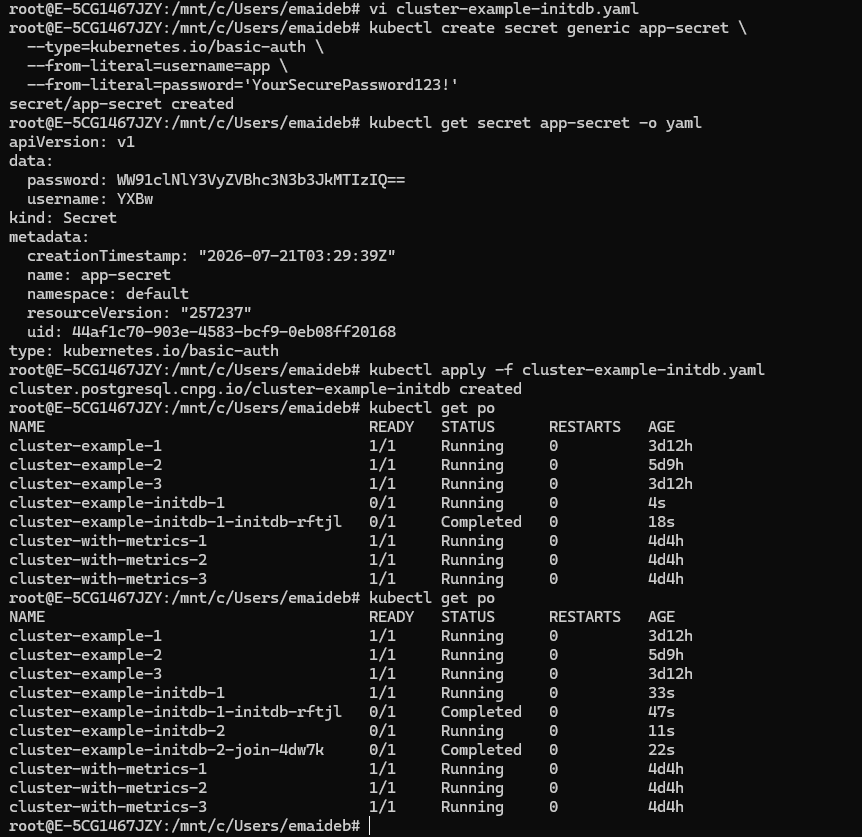
If you want a known password (useful for connecting your application), create a kubernetes.io/basic-auth Secret first:
kubectl create secret generic app-secret \
  --type=kubernetes.io/basic-auth \
  --from-literal=username=app \
  --from-literal=password='YourSecurePassword123!'
Verify it was created correctly:
kubectl get secret app-secret -o yaml
Expected output shows the base64-encoded username/password:
apiVersion: v1
data:
  password: WW91clNlY3VyZVBhc3N3b3JkMTIzIQ==
  username: YXBw
kind: Secret
type: kubernetes.io/basic-auth
⚠️ The
usernamein the Secret must match theownerfield in your Cluster spec — this is how the operator ties them together.
Now deploy:
kubectl apply -f cluster-example-initdb.yaml
Step 1.3: Customizing initdb — Locale, Encoding, Checksums
You’re not limited to just the database name and owner. CloudNativePG passes several options straight through to initdb:
apiVersion: postgresql.cnpg.io/v1
kind: Cluster
metadata:
  name: cluster-example-initdb
spec:
  instances: 3
  bootstrap:
    initdb:
      database: app
      owner: app
      dataChecksums: true
      encoding: 'UTF8'
      localeCollate: 'en_US.UTF-8'
      localeCType: 'en_US.UTF-8'
  storage:
    size: 1Gi
| Option | Maps to initdb flag | What it does |
|---|---|---|
dataChecksums | -k | Enables page-level checksums to detect silent I/O corruption |
encoding | --encoding | Template database encoding (default: UTF8) |
localeCollate | --lc-collate | Sort order locale (default: C) |
localeCType | --lc-ctype | Character classification locale (default: C) |
localeProvider | --locale-provider | libc, icu, or builtin (PG 15+) |
icuLocale | --icu-locale | ICU locale string (PG 15+, requires localeProvider: icu) |
walSegmentSize | --wal-segsize | WAL segment size in MB (default: 16) |
Recommendation: Enable
dataChecksums: trueon all production clusters. It has minimal overhead and gives you early warning of storage corruption — something you really want to know about before it becomes a bigger problem.
Step 1.4: Running Custom SQL After Initialization
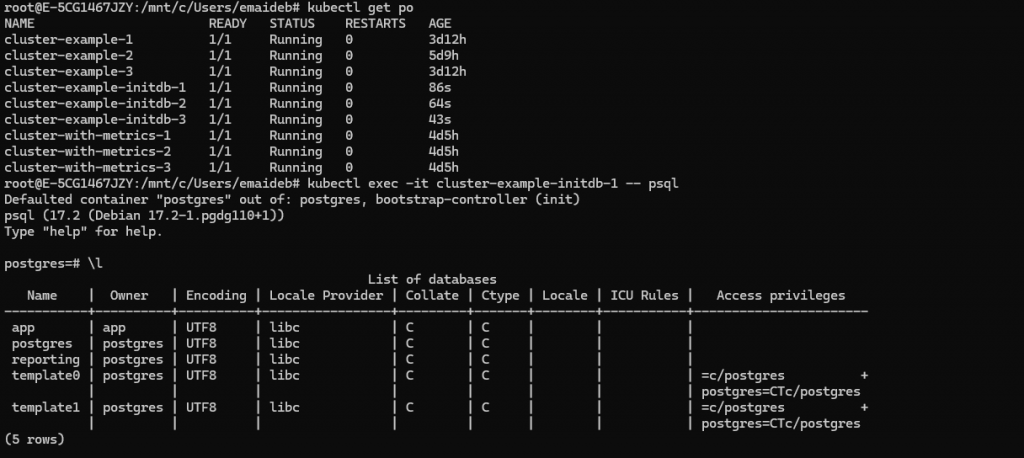
This is one of the most useful initdb features — running SQL automatically right after the cluster is created, without needing an init container or manual step.
The queries run in this order, all as the postgres superuser:
1. postInitSQL           → runs against the postgres database
2. postInitTemplateSQL   → runs against the template1 database
3. postInitApplicationSQL → runs against the application (app) database
Each has two ways to supply SQL: inline in the YAML, or as a reference to a Secret/ConfigMap.
Inline SQL example — creating an extra database at bootstrap time:
apiVersion: postgresql.cnpg.io/v1
kind: Cluster
metadata:
  name: cluster-example-initdb
spec:
  instances: 3
  bootstrap:
    initdb:
      database: app
      owner: app
      dataChecksums: true
      postInitSQL:
        - CREATE DATABASE reporting
  storage:
    size: 1Gi
Secret/ConfigMap reference example — for larger SQL scripts:
kubectl create configmap app-init-sql \
  --from-literal=configmap.sql="CREATE EXTENSION IF NOT EXISTS pgcrypto; CREATE SCHEMA audit;"
spec:
  bootstrap:
    initdb:
      database: app
      owner: app
      postInitApplicationSQLRefs:
        configMapRefs:
          - name: app-init-sql
            key: configmap.sql
⚠️ Use with extreme caution. These queries run as superuser. An error in any of them interrupts the bootstrap phase entirely, leaving the cluster incomplete and requiring manual intervention. Test your SQL thoroughly before relying on this in production.
Part 2: Understanding externalClusters — The Shared Foundation
Before we get to recovery and pg_basebackup, you need to understand externalClusters — because both methods depend on it.
An externalClusters entry describes a source PostgreSQL cluster. It needs:
- A name to identify it (referenced later via
source:) - At least one of:
- Streaming connection info (host, user, password/TLS certs) — for live cloning
- Recovery object store info (S3/Azure/GCS via Barman Cloud) — for backup-based recovery
| externalClusters contains… | Enables pg_basebackup | Enables recovery |
|---|---|---|
| Only streaming connection | ✅ | ❌ |
| Only object store | ❌ | ✅ |
| Both | ✅ | ✅ |
Think of externalClusters as your address book of “places PostgreSQL data can come from” — Kubernetes doesn’t care if that source is a live server or an S3 bucket full of backups; it’s just a named reference you point your bootstrap method at.
Part 3: Bootstrap from a Backup — recovery
The recovery method restores a physical base backup and replays WAL files — either fully, or up to a specific point in time (PITR). Since this method relies heavily on backup storage configuration, we’ll cover the full mechanics in Post 8 (Backup, Recovery & WAL Archiving). For now, here’s the shape of it:
apiVersion: postgresql.cnpg.io/v1
kind: Cluster
metadata:
  name: cluster-restored
spec:
  instances: 3
  bootstrap:
    recovery:
      source: source-db
  storage:
    size: 1Gi
  externalClusters:
    - name: source-db
      barmanObjectStore:
        destinationPath: "s3://my-backup-bucket/"
        serverName: "source-db"
        s3Credentials:
          accessKeyId:
            name: aws-creds
            key: ACCESS_KEY_ID
          secretAccessKey:
            name: aws-creds
            key: ACCESS_SECRET_KEY
The key things to know now:
recoveryreads from an object store (S3, Azure Blob, or GCS) managed via Barman Cloud- It needs both the WAL archive (for PITR) and the base backup catalog
- This is how you rebuild a cluster after a disaster, spin up a replica cluster in another region, or clone data into a new namespace
We’ll build a complete working example with real S3 buckets and PITR testing in Post 8. For now, just remember: recovery = restore from stored backups.
Part 4: Bootstrap from a Live Cluster — pg_basebackup
This is the method most people find surprising the first time they see it: CloudNativePG can create a brand-new cluster by directly cloning a running PostgreSQL instance over the streaming replication protocol — no backup files involved at all.
When to Use pg_basebackup
| Good use cases | Why |
|---|---|
| Reporting/BI clusters refreshed daily | Get a full physical copy of production data on a schedule |
| Test environments with realistic data | Periodic regeneration + anonymization |
| Quick standalone replica spin-up | Faster than going through backup/restore |
| Migrating CloudNativePG clusters between namespaces or K8s clusters | Clean physical copy, same major version |
When NOT to Use It
⚠️ Do not use
pg_basebackupto migrate an external, non-Kubernetes PostgreSQL server into CloudNativePG unless you’ve thoroughly tested every requirement below. The CloudNativePG community explicitly recommends logical import instead for that use case (which we’ll cover when we do Oracle/PostgreSQL migrations later in this project). Getting all the physical replication requirements to line up with an external server is rare in practice.
Step 4.1: Requirements Checklist
Before attempting pg_basebackup, confirm:
- [ ] Target and source have the same CPU architecture (e.g., both x86_64)
- [ ] Target and source run the same major PostgreSQL version
- [ ] Target and source have the same tablespaces
- [ ] Source has enough
max_wal_sendersconfigured (at least 2: one for the backup, one for ongoing WAL streaming) - [ ] Network path exists from target → source on the PostgreSQL port
- [ ] Source has a role with
REPLICATION LOGINprivilege, accepting connections from the target inpg_hba.conf
Step 4.2: Method A — Username/Password Authentication
On the source PostgreSQL instance, create a replication user (skip this if cloning from another CloudNativePG cluster, which already has streaming_replica):
apiVersion: postgresql.cnpg.io/v1
kind: Cluster
metadata:
 name: pgdata1
spec:
 instances: 3
 postgresql:
  pg_hba:
   - host replication repuser all md5
 bootstrap:
  initdb:
   database: appdb
   owner: appuser
   postInitSQL:
    - CREATE USER appuser1 PASSWORD 'appuser1';
   postInitApplicationSQL:
    - CREATE TABLE sample (
       sampleid SERIAL PRIMARY KEY,
       sampledata VARCHAR(50) NOT NULL);
    - INSERT INTO sample(sampledata) VALUES('Edmonton');
    - ALTER TABLE sample OWNER to appuser;
    - GRANT CONNECT ON DATABASE appdb TO appuser1;
    - GRANT ALL ON sample TO appuser1;
 storage:
  size: 1Gi
kubectl apply -f pgdata1.yaml
root@E-5CG1467JZY:/mnt/c/Users/emaideb# kubectl exec -it pgdata1-1 — psql -U postgres -d appdb -c “\dt”
Defaulted container “postgres” out of: postgres, bootstrap-controller (init)
List of relations
Schema | Name | Type | Owner
——–+——–+——-+———
public | sample | table | appuser
(1 row)
root@E-5CG1467JZY:/mnt/c/Users/emaideb# kubectl exec -it pgdata1-1 — psql -h localhost -U appuser1 -d appdb -c “SELECT * FROM sample;”
Defaulted container “postgres” out of: postgres, bootstrap-controller (init)
Password for user appuser1:
sampleid | sampledata
———-+————
1 | Edmonton
(1 row)
root@E-5CG1467JZY:/mnt/c/Users/emaideb# kubectl exec -it pgdata1-1 — psql -U postgres
Defaulted container “postgres” out of: postgres, bootstrap-controller (init)
psql (17.2 (Debian 17.2-1.pgdg110+1))
Type “help” for help.
postgres=# select * from pg_hba_file_rules;
rule_number | file_name | line_number | type | database | user_name | address | netmask | auth_method | options | error
————-+———————————————+————-+———+—————+————————-+———+———+—————+————————–+——-
1 | /var/lib/postgresql/data/pgdata/pg_hba.conf | 7 | local | {all} | {all} | | | peer | {map=local} |
2 | /var/lib/postgresql/data/pgdata/pg_hba.conf | 10 | hostssl | {postgres} | {streaming_replica} | all | | cert | {clientcert=verify-full} |
3 | /var/lib/postgresql/data/pgdata/pg_hba.conf | 11 | hostssl | {replication} | {streaming_replica} | all | | cert | {clientcert=verify-full} |
4 | /var/lib/postgresql/data/pgdata/pg_hba.conf | 12 | hostssl | {all} | {cnpg_pooler_pgbouncer} | all | | cert | {clientcert=verify-full} |
5 | /var/lib/postgresql/data/pgdata/pg_hba.conf | 19 | host | {replication} | {repuser} | all | | md5 | |
6 | /var/lib/postgresql/data/pgdata/pg_hba.conf | 26 | host | {all} | {all} | all | | scram-sha-256 | |
(6 rows)
postgres=# CREATE USER repuser PASSWORD ‘repuser’ REPLICATION;
CREATE ROLE
postgres=# exit
Create the password secret on the target (Kubernetes) side:
root@E-5CG1467JZY:/mnt/c/Users/emaideb# kubectl create secret generic repuser-secret –from-literal=password=repuser
secret/repuser-secret created
Deploy the target cluster:
apiVersion: postgresql.cnpg.io/v1
kind: Cluster
metadata:
 name: pgdata2
spec:
 instances: 3
 bootstrap:
  pg_basebackup:
   source: pgdata1
 externalClusters:
 - name: pgdata1
   connectionParameters:
    host: pgdata1-rw
    user: repuser
   password:
    name: repuser-secret
    key: password
 storage:
  size: 1Gi
kubectl apply -f pgdata2.yaml
Watch the clone happen:
kubectl get pods -w
root@E-5CG1467JZY:/mnt/c/Users/emaideb# kubectl apply -f pgdata2.yaml
cluster.postgresql.cnpg.io/pgdata2 created
root@E-5CG1467JZY:/mnt/c/Users/emaideb# kubectl exec -it pgdata2-1 — psql -h localhost -U appuser1 -d appdb -c “SELECT * FROM sample;”
Defaulted container “postgres” out of: postgres, bootstrap-controller (init)
Password for user appuser1:
sampleid | sampledata
———-+————
1 | Edmonton
(1 row)
Step 4.3: Method B — TLS Certificate Authentication (Recommended)
This is the more secure option, and it’s especially convenient when cloning between two CloudNativePG clusters in the same Kubernetes cluster — since CloudNativePG already manages TLS certificates for the streaming_replica user by default.
Let’s clone our cluster-example (from earlier posts) into a brand-new cluster called cluster-clone-tls:
apiVersion: postgresql.cnpg.io/v1
kind: Cluster
metadata:
  name: cluster-clone-tls
spec:
  instances: 3
  bootstrap:
    pg_basebackup:
      source: cluster-example
  storage:
    size: 1Gi
  externalClusters:
    - name: cluster-example
      connectionParameters:
        host: cluster-example-rw.default.svc
        user: streaming_replica
        sslmode: verify-full
      sslKey:
        name: cluster-example-replication
        key: tls.key
      sslCert:
        name: cluster-example-replication
        key: tls.crt
      sslRootCert:
        name: cluster-example-ca
        key: ca.crt
Notice the source host: cluster-example-rw.default.svc — this is the -rw service from cluster-example, exactly the service type we covered back in Post 1. The clone always connects to the current primary.
kubectl apply -f cluster-clone-tls.yaml
Verify the clone completed and check its status:
kubectl cnpg status cluster-clone-tls
Expected output — a healthy, independent 3-instance cluster:
Cluster Summary
Name:               default/cluster-clone-tls
Status:             Cluster in healthy state
Instances:          3
Ready instances:    3
Step 4.4: Configuring the Application Database on Clone
Just like initdb, you can configure the application database as part of a pg_basebackup bootstrap:
spec:
  bootstrap:
    pg_basebackup:
      source: cluster-example
      database: app
      owner: app
      secret:
        name: app-secret
After the clone completes, the operator will:
- Create the
appdatabase if it doesn’t already exist - Create the
appuser if it doesn’t already exist - Grant ownership of
appdatabase to theappuser if needed - Update the
appuser’s password to match the secret
Note: If the new cluster is created in replica mode (continuously following the source), this application database setup is skipped entirely — replica clusters stay read-only and synchronized, so there’s nothing to “configure” independently.
Part 5: Understanding the Snapshot Limitation
This is the single most important thing to understand about pg_basebackup bootstrap, and it’s easy to miss.
Source (still running)          Target (new clone)
     │                                │
     │──── snapshot taken ───────────▶│
     │                                │  Target starts on a
     │  writes continue...            │  NEW TIMELINE here
     │  (not captured)                │
     ▼                                ▼
  Source keeps                   Target diverges —
  diverging from                 no longer receiving
  target after this point        source's new writes
Once the backup completes, the target cluster starts on a new PostgreSQL timeline and immediately diverges from the source. It does not continue streaming from the source afterward (unless you’ve explicitly configured it as a replica cluster).
Practical implication: If you’re using this for a migration (not a replica cluster), stop all writes to the source before cloning, or you’ll lose any transactions written after the snapshot was taken.
Before attempting a production migration with this method, test the full procedure repeatedly and measure the actual downtime your applications experience. Don’t assume — measure.
Bonus: Image Catalogs — Choosing Your PostgreSQL Version Declaratively
While we’re on the topic of cluster creation, it’s worth knowing about Image Catalogs — a clean way to manage which PostgreSQL image version your clusters use, instead of hardcoding imageName everywhere.
apiVersion: postgresql.cnpg.io/v1
kind: ClusterImageCatalog
metadata:
  name: postgresql
spec:
  images:
    - major: 16
      image: ghcr.io/cloudnative-pg/postgresql:16.10
    - major: 17
      image: ghcr.io/cloudnative-pg/postgresql:17.6
    - major: 18
      image: ghcr.io/cloudnative-pg/postgresql:18.1
Then reference it in your Cluster by major version instead of a specific tag:
spec:
  imageCatalogRef:
    apiGroup: postgresql.cnpg.io
    kind: ClusterImageCatalog
    name: postgresql
    major: 17
ImageCatalogis namespace-scoped;ClusterImageCatalogis cluster-wide. Use the cluster-wide version if multiple teams/namespaces should share the same approved image list — useful for enforcing a company-wide standard on which PostgreSQL versions are allowed.
Common Errors and Fixes
Error 1: “multiple bootstrap methods” validation error
Symptom:
error: error validating "cluster.yaml": ValidationError(Cluster.spec.bootstrap):
only one bootstrap method may be specified
Cause: You accidentally defined both initdb: and pg_basebackup: (or another combination) under bootstrap:.
Fix: Remove all but one bootstrap method block from your YAML.
Error 2: pg_basebackup clone hangs at “waiting for source”
Symptom:
kubectl get pods
NAME             READY   STATUS    RESTARTS   AGE
target-db-1      0/1     Running   0          5m   (never becomes Ready)
Cause: Usually a network/authentication issue — the target can’t reach the source, or the replication user credentials are wrong.
Fix:
# Check the pod logs for connection errors
kubectl logs target-db-1 | grep -i "error\|fatal"

# Common causes:
# 1. pg_hba.conf on source doesn't allow the replication user from target's IP
# 2. max_wal_senders too low on source
# 3. Wrong password in the secret

# Verify secret content
kubectl get secret source-db-replica-user -o jsonpath='{.data.password}' | base64 -d
Error 3: postInitSQL error leaves cluster incomplete
Symptom:
kubectl cnpg status cluster-example-initdb
Status: Cluster in failed state — bootstrap incomplete
Cause: One of your postInitSQL statements had a syntax error or referenced something that doesn’t exist yet.
Fix:
# Check the instance manager logs for the exact SQL error
kubectl logs cluster-example-initdb-1 | grep -A 5 "postInitSQL"

# Delete the failed cluster and fix the SQL before retrying
kubectl delete cluster cluster-example-initdb

# Test your SQL manually first against a throwaway database
# before adding it to postInitSQL
Key Takeaways
✅ CloudNativePG supports exactly three bootstrap methods — initdb, recovery, and pg_basebackup — and only one can be used per cluster.
✅ initdb is the default and creates a brand-new empty cluster. Use postInitSQL, postInitTemplateSQL, and postInitApplicationSQL to run setup SQL automatically at creation time — but test thoroughly, since errors here abort the bootstrap.
✅ externalClusters is the shared building block behind both recovery and pg_basebackup — it’s just a named reference to a source, whether that source is an object store full of backups or a live streaming connection.
✅ pg_basebackup clones a live running instance directly — great for reporting clusters, test data refresh, and same-cluster migrations. It is explicitly not recommended for migrating external non-Kubernetes PostgreSQL servers — use logical import instead.
✅ Once a pg_basebackup clone completes, the target starts on a new timeline and diverges from the source immediately. Stop writes on the source first if you’re not creating a replica cluster.
Test Your Knowledge
Ready to test what you’ve learned? Take the free quiz:
👉 PostgreSQL Replication Quiz → gradeupnow.in/postgres-replication-quiz/
20 questions · Instant feedback · Detailed explanations · Free
What’s Next
This post is part of the PostgreSQL on Kubernetes (CloudNativePG) series:
| # | Post | Status |
|---|---|---|
| 1 | CloudNativePG Architecture on AWS EKS | ✅ Published |
| 2 | Installing CloudNativePG on AWS EKS — Step by Step | ✅ Published |
| 3 | PostgreSQL on Kind in WSL Ubuntu with Grafana Monitoring | ✅ Published |
| 4 | PostgreSQL Configuration & Pod Tuning on Kubernetes | ✅ Published |
| 5 | Bootstrap Methods — initdb, Recovery, pg_basebackup | 📍 You are here |
| 6 | Importing Databases & Security on CloudNativePG | ⬜ Coming next week |
In Post 6, we cover importing existing PostgreSQL databases (including from different major versions) using logical import — the recommended path for real migrations — plus a deep dive into CloudNativePG’s security model.
👉 [Next Post: Importing Databases & Security on CloudNativePG → coming next week]
References
- EDB CloudNativePG Documentation — Bootstrap
- EDB CloudNativePG Documentation — Image Catalog
- PostgreSQL initdb Documentation
- PostgreSQL pg_basebackup Documentation
- PostgreSQL Locale Support Documentation
- PostgreSQL High Availability, Load Balancing, and Replication
Found this helpful? Share it with your DBA team! Questions? Drop them in the comments below.
Screenshot guide: 6 screenshot placeholders in this post. Most valuable for readers: the
postInitSQLverification (Step 1.4) and thepg_basebackupclone completing successfully (Step 4.3) — this second one is genuinely impressive to see work for the first time.